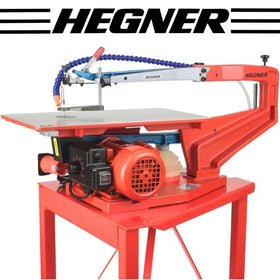
If you are looking for information on how to use your Hegner Scroll Saw, please see the Instruction Manual:
Hegner Scroll Saw Instruction Manual
If you are having a troubleshooting issue with your Hegner Scroll Saw, please first reference the below guide:
If you are looking for Hegner Scroll Saw Parts, see the below page:
Helpful Demonstrational Videos
How to Mount a Blade
How to Tension the Blade
How to Insert the Blade for an Inside Cut
How to Use the QuickClamp
FAQS for the Hegner Scroll Saw:
Q: My variable speed is erratic or only runs at 1 speed, what can I do?
A: When your variable speed is starting to go, try minimally re-adjusting the potentiometer setting. This requires no more than a screwdriver and minimal mechanical skills. Here are the steps:
1) UNPLUG the saw from the power source. If you test and then do more work as outlined below, ALWAYS unplug the motor again before re-opening the switchbox!
2) Open the switchbox and gently draw the front portion away from the back, making sure not to pull off any wires and Gently blow out any dust that has accumulated inside the box.
3) Check all wires to ensure they are securely connected - sometimes a loose wire can be the source of this problem. If you are unsure about where wires should be connected, please contact us.
4) If one or more wires were loose and reconnected, close switch box and test motor to see if the problem is resolved. If it is not, unplug, reopen and proceed to next step.
5) Locate the small (appr. 1/8" diameter and usually orange-colored, with cross-cut slots so you can insert a small standard or Phillips screwdriver) screw-like head, usually on the left side near vertical center of the electronic circuit board (which is attached to the front portion of the switchbox you should be holding in your hand).
6) Turn this "screw" ever so slightly in either direction - we recommend moving it no more than the equivalent of one hour on a clock face, then test the speed control by closing the box and running the saw normally. Often this should be adequate to calibrate the speed control, if not, try turning by the equivalent of another hour, but we recommend no more than 1/4 turn (or 3 hours) in either direction. Take care by marking your starting points with a marker. It's not uncommon for the calibration to require some time to find it's "spot", so please be patient to let the saw run 60 mins or so before re-trying the adjustment.

7) If the problem is still not resolved, unplug, reopen and repeat the potentiometer adjustment, but turn in the opposite direction. Again, do not significantly change the position - doing so will change the functional operating speed of the motor and may result in excess vibration at a higher top speed. All you need to do is to change the internal contact points from what they were.
8) Close the switchbox and test. If the problem remains you will require a new circuit board https://www.advmachinery.com/products/m18v-m18s-part-number-266-electronic-circuit-board-for-variable-speed-control-on-models-m14-v-m18-v-and-m22-v
. These are usually in stock at our parts warehouse and can be ordered online or by phone (M-F, 10-3 ET) at 1-800-727-6553. When ordering new circuit boards, ALWAYS include your machine/serial number in the ‘NOTES’ box at check-out to insure the correct part.
* Note : If the "fix" is successful once, note that this procedure may be repeated, but it is less likely to be successful in the future. If this saw's operation is critical for you, it is recommended to order a circuit board BEFORE it fails completely and leaves the machine temporarily inoperable.
Q: Issue: Blades are breaking excessively.
First, make sure you have broken enough blades to confirm that it is indeed an ongoing issue: sometimes one or two blades can break for random reasons and the problem disappears by itself.
Next, check whether the problem is only with a certain type, size, batch or brand of blades. Very often a blade problem is just that: a problem originating from and due to a manufacturing problem with the blades themselves. In that case, please contact your blade supplier.
If , however, the problem continues and occurs with multiple blade types, determine whether blades are breaking primarily in one particular area of the blade (near the top, in the middle, or at the bottom). This will be your most important clue. Breakage near the ends is typically an indication that there is a mechanical problem with the blade mounting or the machine in general, while breakage in the middle is usually due to a bad or poorly chosen blade, incorrect tensioning, or poor sawing technique.
If breakage is near the ends or near the clamps, it might be that the clamps are tightened too hard or constricted in free movement. If breakage at the ends is also accompanied by increased noise or vibration in the saw, this confirms that the saw requires attention. The most likely cause is wear of the tension rod resulting in inadvertent loss of tension, or wear of the main arm bushings resulting in compromised control of the blade motion.
If you feel your technique can be improved, we recommend online or local instruction in general scroll saw use. If you have technical or mechanical questions that are not answerable using your manual or the manuals and parts diagrams listed on our website, please contact us by phone or e-mail - we are happy to help.
Q: Why does my blade keep slipping out of the clamp when I'm sawing?
A: The clamps do wear out over time and use. A lot of use will wear down the metal. It’s difficult to place a timeline on the average life span of clamps as there are many factors involved, like how often the user is running inside/fret cuts and threading the blade through work and reinstalling it to the clamp. This kind of scroll work with constant contact to the end of the blade can build up natural oils or dust from the hand which then transfer that to the inside of the clamp. You can try to clean the blade ends and clamp with a good grease cutting agent and/or use an Emory cloth to roughen the surfaces for better grasp. Ultimately, you should consider getting a new or spare pair.
Consider watching our video on how to mount a blade into the clamp. Since it’s only a couple minutes long, it’s worth reviewing.
Following the steps will help to center the blade at the point of the clamp where it’s best gripped. If the blade is off center from the point, then the grip is greatly diminished. To be clear, when loading the blade, you allow the end of the blade to touch the thread of the screw and then you back it down just a ‘hair’ away from the screw to ensure that it doesn’t move the blade off center when tightening the clamp. Ideally, the blade should have the grace of a slight undulation within the clamp point which is naked to eye. Overtightening will cause either the blade or the screw to break
Q: My machine is suddenly making loud noises, what's the likely cause?
A: One of the most integral parts of the operation of a Hegner Scroll Saw is the Connector (aka Cam, part#21/221), which connects the motor shaft to the lower arm and motivates the arms to saw. First, check that the hardware is snug, that there are no breaks or cracks in the black oval, and that the sealed bearings have no rust or pitting. If anything is compromised, even a hairline fracture will soon give way to breakage, you should replace the Connector ASAP. Your saw can not cut without this part intact.
HEGNER How to Change a Connector, part#21/#221
Q: What is the Wiring Schematic for my variable speed circuit board?
A: Please see the attached (link) instructions with easy to follow pictures. No engineering degree required:
HEGNER How to REPLACE THE ELECTRONIC CIRCUIT BOARD
Q: How do I connect a new replacement Switch?
A: Please see attached(link) instructions: HEGNER How to Replace a New Switch part #265SN
Q: Why is my Blade not centered in the slot?
A: Please see attached (link) detailed instructions: HEGNER, ALIGNING YOUR SCROLL SAW
Q: Can I put my Saw with Stand on wheels?
A: Hegner does not recommend any kind of wheels fastened to the bottom of the stand. Rather, the holes that are already included at the bottom of the legs are actually there to reduce mobility and bolt the stand to a wood floor. However, we have had some customers get creative and I’m glad that they have shared their ingenuity with us so I can pass it along to nice people like you. We’d also suggest just putting these on 2 of the 3 legs so you can easily tilt the setup and push/roll it around to its destination.
Since wheels at the bottom would not only add a substantial height to the saw, much less structural compromise even if the wheels lock, it has been agreed by our consultants that if wheels were necessary, that they be attached to the sides of the legs with retractable wheels. We do not offer these wheels as, again, they are not endorsed by Hegner but you can look on the web for “Retractable Workbench Casters”.
Full Hegner Manual & Parts Lists (Includes Old / Discontinued Models)
HEGNER Multimax-1 (also Hobbymax) Parts Diagram
HEGNER M14-E (also Multimax-2) and M14-V Parts Diagram
HEGNER M18-S and M18-V Parts Diagram
HEGNER Older M18V w/o Front Tension Lever
HEGNER Multimax M25-S and M25-V Parts Diagram
HEGNER Polymax (Polycut-3) Parts Diagram
Hegner Quick Clamp vs Standard Clamps
HEGNER TWS-230 Drum Sander Parts Diagram
HEGNER Unimax Parts Diagram for Machine Serial Numbers 031607 and higher
HEGNER Unimax Parts Diagram for Machine Serial Numbers up to 0310606
HEGNER Accura MK4 Parts Diagram
HEGNER Accura Sliding Table Parts Diagram
HEGNER HDB175 Lathe Parts Diagram
HEGNER HDB200 Lathe Parts Diagram
HEGNER LKH 950 Duplicator Manual
HEGNER LKH 950 Duplicator Parts Diagram
HEGNER LQ 400 Duplicator Parts Diagram
HEGNER ZFG Fingerjoint Machine Manual
HEGNER How to Change a Connector, part#21/#221
HEGNER How to REPLACE THE ELECTRONIC CIRCUIT BOARD
HEGNER How to Replace a New Switch part #265SN
HEGNER, ALIGNING YOUR SCROLL SAW


